Affiliate Disclosure: I earn commissions if you shop through the links below at no additional cost to you.
Last Updated on May 26, 2024 by Jeremy
Introduction
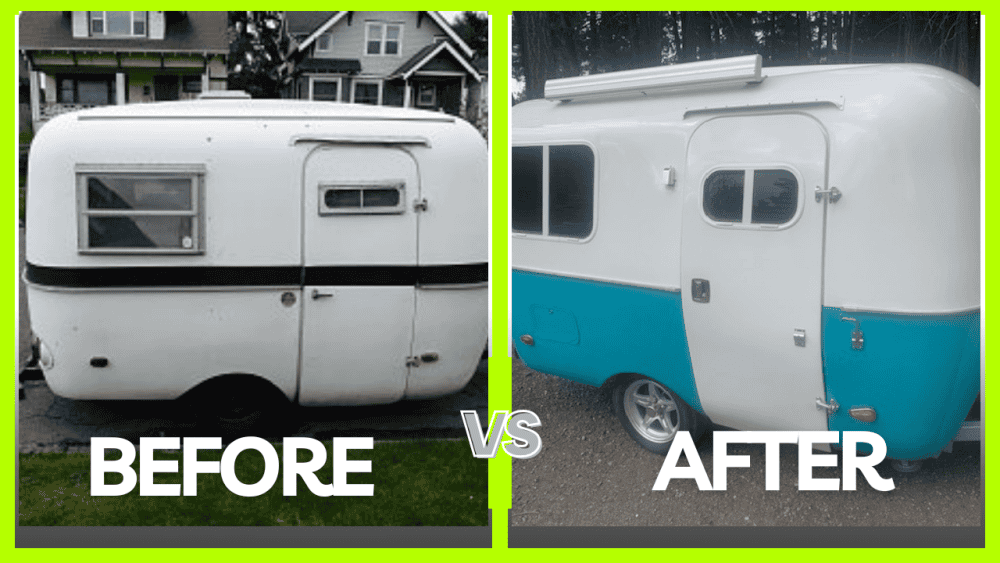
Imagine the satisfaction of taking a beat-up old bumper pull travel trailer and turning it into a cozy, self-contained mobile home. That’s exactly what Shannon, a long-time camper, did with a vintage Boler trailer. Starting the journey in 2011 and finishing in 2022, Shannon’s DIY restoration story is as inspiring as it is informative. Let’s dive into the tale of transforming a forgotten Boler into a traveler’s dream.

The Story Behind the Boler
Shannon has always had a deep passion for the great outdoors. Initially, this passion was expressed through tent camping. However, after years of roughing it on the ground, the desire for more comfort and convenience led Shannon to search for a trailer.
In 2011, Shannon stumbled upon a Boler trailer on Craigslist in Tacoma, Washington. The Boler was in poor condition and didn’t even have a title, but it had the potential to become something special. Despite its dilapidated state, Shannon saw beyond the rust and decay, envisioning a cozy retreat on wheels.

Planning the Renovation
Why take on such an ambitious project? “I didn’t want to sleep on the ground anymore,” says Shannon, who is also a long-time woodworker. With a background in woodworking, Shannon was well-equipped to tackle the restoration.
The decision to restore the Boler was driven by Shannon’s love for crafting and building, combined with the practical need for a more comfortable camping experience.
The goal was clear: to transform the rundown Boler into a functional and stylish mobile home, equipped with modern amenities while retaining its vintage charm.

The Renovation Process
The renovation process was a journey filled with both challenges and triumphs. The first step was demolition, which involved stripping the trailer down to its bare bones.

This was followed by structural repairs to ensure the Boler was safe and sturdy. One of the biggest challenges was attaching multiple pieces of bendable plywood to form the interior walls. This task required creating ‘plywood ribs’ and carefully bending aluminum c-channel for the belly band.
These intricate steps demanded precision and patience. Shannon faced numerous hurdles, such as dealing with the trailer’s aged materials and outdated design. However, each challenge was met with determination and creativity.
For a detailed overview of the entire restoration project, check out this comprehensive guide on Shannon’s journey: Full Restoration Project.
Personal Touches and Custom Features
Shannon didn’t just restore the Boler; it was infused with personality and functionality. The entire interior was revamped with careful attention to detail.

Shannon chose a color scheme that reflected personal style and selected materials that offered both durability and aesthetic appeal. Unique custom features were added, such as handcrafted cabinets and bespoke seating.

These additions not only enhanced the trailer’s functionality but also gave it a distinct, personalized feel.

Life After Renovation
After years of hard work, Shannon finally had a Boler trailer that was both beautiful and practical. The revamped Boler offered a level of comfort and convenience that tent camping could never match. “So comfortable and self-contained,” Shannon says.
The trailer is now easy to tow and park, making it a perfect travel companion. The joy of hitting the road with a home on wheels has made all the effort worthwhile. Shannon enjoys the freedom and flexibility that the Boler provides, whether it’s for a weekend getaway or a longer road trip.

Advice for Fellow Enthusiasts
For those inspired by this story and considering their own DIY camper restoration, Shannon offers some sage advice: “Think outside the box. Be a problem solver. Take your time. Research, research, research.” Patience and creativity are essential.
Shannon emphasizes the importance of thorough research and careful planning. Aspiring restorers are encouraged to tackle problems creatively and not rush through the process. Each step should be approached with care and consideration to ensure the best results.

Conclusion
Reflecting on the journey, Shannon is proud to say, “I’m DONE!” The joy of seeing the finished product, especially the exterior paint reveal, was worth all the hard work. Shannon couldn’t have done it without the help of friends and a partner who contributed, plus those that helped with the plumbing, gas fitting, welding, and electrical work. This DIY camper restoration story is a testament to the power of perseverance and creativity.
For anyone looking to transform their vintage trailer, let Shannon’s journey be your inspiration.
Do you like the outcome of this trailer? I know I was intrigued by it’s uniqueness! Feel free to drop your thoughts in the comments below on this incredible DIY restoration project completed by Shannon!
Happy restoring!
Cheers!


.jpg/:/cr=t:5.56%25,l:0%25,w:100%25,h:88.89%25/rs=w:1240,h:620,cg:true)


Leave a Reply