

Affiliate Disclosure: I earn commissions if you shop through the links below at no additional cost to you.
Last Updated on April 27, 2024 by Jeremy
Introduction: The Challenge of Stubborn Stains on Your RV
Picture this: you’re cruising down the highway, the wind in your hair, the sun on your face, and suddenly, you notice it – a stubborn stain marring the pristine exterior of your beloved RV. From road tar to bird droppings to water spots, RV and travel trailer owners face a myriad of stains that can be as frustrating as they are unsightly.
But fear not, my fellow road warrior, because conquering these stains is not only possible but downright satisfying. In this guide, we’ll explore the ins and outs of removing stubborn stains from your RV’s exterior, empowering you to hit the road with confidence and clarity.
Understanding Your RV’s Exterior: Materials and Vulnerabilities
Your RV’s exterior is like a suit of armor, protecting you from the elements as you journey into the great unknown. But just like any armor, it has its weak points. Understanding the materials that make up your RV – whether it’s fiberglass, aluminum, gel coat, or something in between – is crucial to devising an effective cleaning strategy. For example, fiberglass is durable and lightweight but prone to oxidation, while aluminum is resistant to rust but can scratch easily. By knowing the strengths and weaknesses of each material, you can tailor your cleaning approach to maximize effectiveness while minimizing the risk of damage.
Preparation: Protecting Yourself and Your RV Before You Start
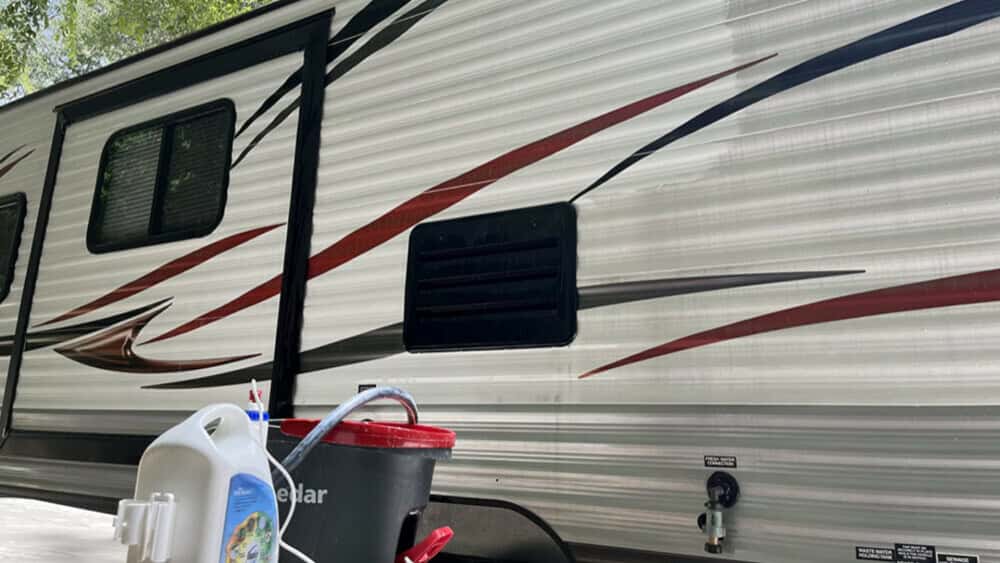
Before you dive headfirst into battle with those stubborn stains, it’s essential to take some precautions to protect yourself and your RV. First and foremost, gear up with protective gloves, goggles, and clothing to shield yourself from harsh cleaning agents and potential splashes. Next, conduct a thorough inspection of your RV’s exterior to assess the severity of the stains and identify any areas of concern. Armed with this knowledge, gather your cleaning arsenal, including brushes, sponges, microfiber cloths, and a selection of cleaning agents tailored to your RV’s specific materials and the type of stains you’re dealing with.
Many of these items can be easily located in out online store as well, and to showcase them, see the RV brush below:
The Step-By-Step Guide to Removing Stubborn Stains
Now that you're suited up and prepared for battle, it's time to roll up your sleeves and get to work. Here's a step-by-step guide to removing stubborn stains from your RV's exterior:
1) Pre-Cleaning Wash: Start by giving your RV a thorough wash-down with a mild detergent and water to remove any surface dirt and grime. This will make it easier to target the stubborn stains later on.
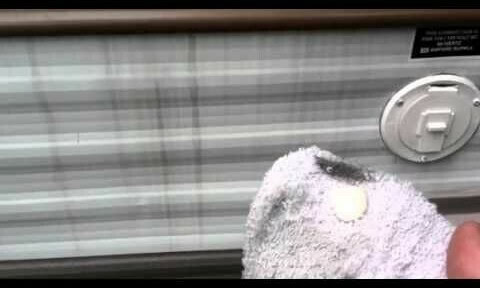
2) Identify the Stains: Take a closer look at the stains on your RV and categorize them based on their type - whether it's tar, grease, rust, or something else entirely. Different stains may require different cleaning techniques and products, so it's essential to know what you're dealing with upfront.
3) Choose the Right Cleaning Agents: Select cleaning agents that are safe and effective for your RV's exterior materials and the type of stains you're tackling. For example, use a specialized rust remover for rust stains and a degreaser for grease spots. You can read our article about the best RV cleaners we listed as well - https://everythingrvsandmore.com/best-rv-cleaning-products/
4) Test in a Small Area: Before applying any cleaning agents to the entire stain, test them on a small, inconspicuous area of your RV to ensure they won't cause damage or discoloration.
5) Apply the Cleaning Agent: Once you've confirmed that the cleaning agent is safe to use, apply it to the stain according to the manufacturer's instructions. Use a soft brush or sponge to gently scrub the area, being careful not to scratch the surface.
6) Rinse Thoroughly: After treating the stain, rinse the area thoroughly with clean water to remove any residue from the cleaning agent.
7) Repeat if Necessary: For particularly stubborn stains, you may need to repeat the cleaning process multiple times until the stain is fully removed.
8) Finish with a Protective Coating: Once the stains are gone, consider applying a protective coating or wax to your RV's exterior to help prevent future staining and keep it looking shiny and new.
Professional Solutions: When to Seek Expert Help
As much as we'd like to believe we're capable of conquering any stain that comes our way, sometimes it's best to call in the cavalry. Here are some scenarios where seeking professional help may be advisable:
- Extremely Stubborn Stains: If you've tried multiple cleaning techniques and products without success, it may be time to enlist the help of a professional RV cleaning service with specialized equipment and expertise.
- Delicate Materials: If your RV has delicate exterior materials that require extra care, such as vintage fiberglass or custom paint, a professional cleaner can ensure that the stains are removed safely without causing damage.
- Time Constraints: If you're short on time or simply don't want to deal with the hassle of cleaning stubborn stains yourself, hiring a professional can save you valuable time and energy.
When choosing a professional RV cleaning service, be sure to do your research and read reviews to ensure they have a good reputation and experience working with RV exteriors.
Plus, if you ever wondered how much it might cost to wash and detail your RV, have a watch of this video:
Preventive Measures: Keeping Your RV Stain-Free in the Future
Now that you've vanquished those stubborn stains and restored your RV to its former glory, it's time to implement some preventive measures to keep it looking pristine for miles to come. Here are some tips to help you maintain a stain-free exterior:
1) Regular Maintenance: Make regular cleaning and maintenance part of your RV care routine to prevent dirt, grime, and stains from building up over time.
2) Protective Products: Invest in protective products such as wax, sealants, and UV protectants to shield your RV's exterior from environmental damage and make it easier to clean in the future.
3) Routine Inspection: Conduct regular inspections of your RV's exterior to catch any potential stains or damage early on and address them before they become more difficult to remove.
As you gear up to hit the road on your next adventure, armed with the knowledge and techniques shared in this guide, remember that maintaining a stain-free exterior isn't just about aesthetics - it's about protecting your investment and ensuring that your RV remains in top condition for years to come.
So, start prepping, stay proactive, and hit the road with confidence, knowing that you have the tools and know-how to keep your RV looking its best. Here's to many more miles of adventure and memories waiting just around the bend!
And if you're ready to take your RV maintenance game to the next level, why not schedule a professional inspection and detailing service? A professional cleaner can give your rig the TLC it deserves, leaving it sparkling clean and ready for your next journey.
Like this article? Feel free to leave a comment below! Have a favourite product? Leave that in the comments as well!
Cheers!


.jpg/:/cr=t:5.56%25,l:0%25,w:100%25,h:88.89%25/rs=w:1240,h:620,cg:true)


Leave a Reply