

Affiliate Disclosure: I earn commissions if you shop through the links below at no additional cost to you.
Last Updated on October 29, 2025 by Jeremy
If you’ve ever stood outside your RV watching the sky turn from “bright and sunny” to “storm incoming” while your power awning groaned halfway in, you already know how critical dependable awning parts are.
After four years of full-time RV living and running parks across British Columbia, I’ve learned that a healthy awning setup isn’t just about comfort — it’s about protecting your investment. Whether you’re upgrading a tired motor, replacing worn fabric, or troubleshooting your Solera Smart Arm, understanding each component can save you time, money, and frustration.
In this guide, we’ll cover everything you need to know about Solera Power Awning Parts in 2025 — what’s universal, what’s not, where to buy replacements, and how to handle basic repairs yourself. Every tip here comes from real experience, tested on the road, and reviewed with today’s newest Solera models in mind.

What Makes Solera Power Awnings Different
Solera power awnings by Lippert Components Inc. have become one of the most recognized names in RV shading systems — and for good reason. Unlike many aftermarket kits that feel like a patchwork of parts, Solera designed their system with cross-compatibility in mind. That means you can replace individual components — like motors, arms, or fabric — without needing to swap the entire awning assembly.
For 2025, Solera’s latest lineup continues to focus on:
-
Universal fitment across major RV brands and frame styles
-
Improved Smart Arm™ technology for smoother, quieter extension
-
Stronger torsion assemblies that reduce fabric sag and flutter
-
Simplified wiring harnesses for faster DIY replacement
These updates make it easier than ever for RVers to maintain, repair, or upgrade their existing awning system without paying dealership markup. Whether you’re running a Solera 12V Smart Arm, a Classic Manual-to-Power conversion, or a Hybrid Universal Kit, each part is designed to install cleanly and work together as a single, cohesive unit.
The result: less downtime, fewer surprises, and more shade time wherever the road takes you.
Universal vs. Model-Specific Parts (2025 Update)
One of the biggest advantages of the Solera system is that many of its parts are truly universal — meaning they fit multiple awning brands and styles with only minor adjustments. But not every component is a one-size-fits-all solution, and knowing the difference can prevent a costly return.
✅ Universal Solera Parts
These components fit most RV makes and awning models (Dometic, Carefree, and older Lippert units included):
-
Awning arms and hardware kits — Universal fit for both flat and pitched RV walls
-
12V Smart Arm power switches — Compatible with most 2020+ Solera assemblies
-
Switch harnesses and wiring kits — Pre-terminated for easy plug-and-play installs
-
Roller assemblies and torsion heads — Standard 8’–21’ lengths with interchangeable ends
-
Awning fabrics — Cut-to-fit vinyl and acrylic materials with multi-brand compatibility
⚠️ Model-Specific Solera Parts
Some Solera components require the exact model match to work correctly:
-
Integrated motion sensors and wind guards (Smart Arm exclusive)
-
Powered pitch arm kits — Designed for select Solera 12V Smart Arm systems
-
Manual-to-power conversion brackets — Specific to certain Dometic or Carefree retrofits
When in doubt, always confirm your awning arm model number (usually printed on a small label under the right-hand arm) before ordering. If it’s unreadable, Lippert’s support line or your dealer can help you cross-reference the right part number.
Knowing which parts are universal and which aren’t can make all the difference between a one-hour job and a weekend-long project.
Top Solera Power Awning Parts (With Real Use Cases)
When you break down a Solera power awning, there are six main components that make or break its performance. Here’s what each part does, how long it lasts, and a few lessons learned from the road.
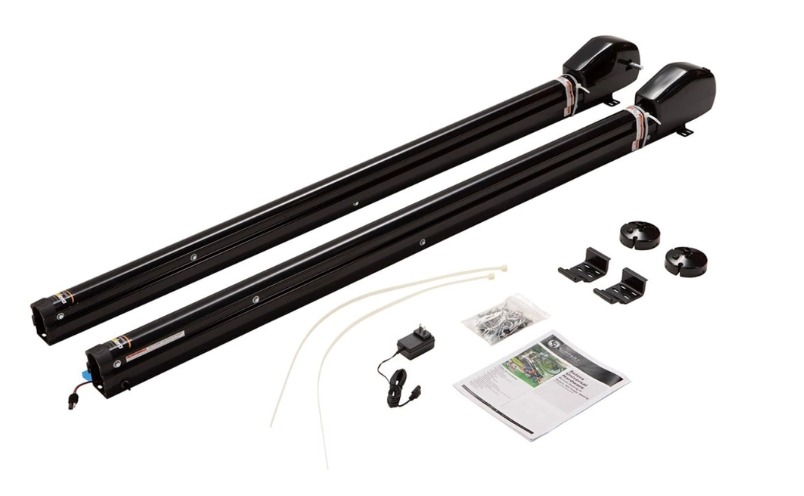
1. Awning Arms and Hardware Kits
The backbone of every Solera system. These hold the roller tube and provide extension and retraction support.
Pro Tip: If your arms bend or stick during operation, don’t force them. A quick inspection often reveals loose pivot bolts or debris in the arm tracks.
Jeremy’s Note: I had to replace my right-hand arm in Quartzsite, AZ, after a sandstorm bent the hinge. The universal Solera kit fit perfectly without modification.
2. Awning Motors
The 12V DC power motor drives the extend/retract motion. Most models use the same motor across 2020–2025 systems.
Lifespan: 3–5 years with moderate use.
Replacement tip: If the awning hesitates or only moves a few inches, test the motor wiring before replacing.
Good upgrade: Solera Power Awning Motor Kit #373566 — quieter and faster than the older version.
3. Switch Kits and Smart Arm Modules
Modern Solera systems use wall-mounted or Smart Arm control panels with programmable features like auto-retraction during high wind.
Jeremy’s Note: The Smart Arm touch panel has been a game changer. At Kentucky-Alleyne, ours automatically retracted twice during strong gusts — no damage, no panic.
4. Torsion Heads and Roller Tubes
These balance the awning and keep tension even across the fabric.
Warning: A failing torsion head can cause uneven extension or jerky movement — a common cause of torn fabric.
Maintenance tip: Lubricate pivot points annually with a dry silicone spray.
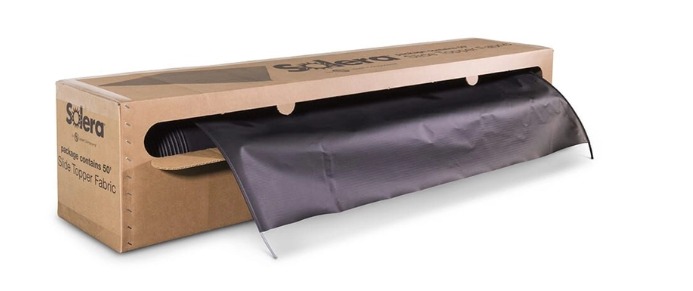
5. Awning Fabric
Available in vinyl or acrylic, Solera fabrics are pre-measured by extension length (8’–21’).
Jeremy’s Note: If you camp in desert heat or coastal salt air, go for acrylic — it breathes better and lasts longer.
DIY Tip: Use painter’s tape to mark your roller tube before sliding in the new fabric. It saves alignment headaches.
6. Power Conversion Kits
If you’re still running a manual crank setup, Solera’s Manual-to-Power Conversion Kit is one of the easiest upgrades you can do yourself.
Cost: Typically $300–$500.
Install Time: About 90 minutes with a power drill and socket set.
Each of these parts is available individually, making Solera one of the most modular awning systems in the RV world. That flexibility is a major reason why I recommend it to both new and full-time RVers alike.
Troubleshooting — When to Replace, When to Repair
A Solera power awning is one of those systems that’ll tell you something’s wrong long before it fails completely — if you know what to listen for. Here’s a breakdown of the most common issues I’ve seen (and fixed) while managing parks and living full-time on the road.
Awning Won’t Extend or Retract
Likely causes:
-
Weak 12V power source or dead battery
-
Faulty switch or wiring harness
-
Burned-out motor
Quick fix: Test the motor leads directly with a 12V source. If the awning moves, your switch or wiring is the culprit — not the motor.
Replace: If the motor buzzes or clicks but doesn’t turn, it’s time for a new one.
Awning Sags, Jerks, or Doesn’t Roll Evenly
Likely causes:
-
Worn torsion spring or roller tube
-
Uneven arm tension or bent hardware
-
Debris jammed in the arm channel
Repair: Realign both arms, clean out debris, and check your roller spring tension.
Replace: If one side extends faster than the other, it’s often a failing torsion head.
Fabric Tears or Flaps Excessively
Likely causes:
-
UV degradation
-
Improper tension
-
Wind damage during retraction
Repair: Small tears can be patched using a vinyl repair kit until your next trip.
Replace: If the tear reaches the roller tube seam or the color fades drastically, swap the fabric. It’s cheaper and safer in the long run.
Smart Arm Not Responding
Likely causes:
-
Power interruption
-
Faulty module
-
Damaged motion sensor
Repair: Disconnect power for 30 seconds, then reset.
Replace: If your module doesn’t light up after power reset, replace the control unit.
Jeremy’s Take:
I always tell guests at our park — “If it sounds tired, it probably is.” Power awnings rarely quit suddenly. The signs build up over weeks: slower movement, clicking, fabric slack. Listening early can save you hundreds and keep your shade where it belongs — over your picnic table, not on the ground.
🎥 Watch: How to Clean and Maintain Your RV Awning
Before you jump into repairs or replacements, take a minute to check out this short video where I show exactly how I keep our Solera awning clean and running smooth all season long.
👉 Watch on YouTube
Regular cleaning and tension checks can add years to your awning’s life — and save you from preventable fabric tears and motor strain.
DIY Replacement Tips (Step-by-Step)
Replacing Solera power awning parts isn’t as intimidating as it looks. Most of the work involves patience, steady hands, and a friend to help hold things in place. Here’s how I approach typical repairs out in the field.
Before You Start
-
Kill the power. Disconnect your RV’s 12-volt source or flip the fuse.
-
Park on level ground. Uneven footing can twist your arms or roller tube.
-
Label your wiring. A simple strip of masking tape saves you hours later.
-
Take photos first. Snap before every disassembly step — trust me on this one.
To Replace a Solera Motor
-
Remove both arm end-caps.
-
Disconnect the old motor’s quick-connect wiring.
-
Unscrew the motor housing (usually three Phillips screws).
-
Install the new motor, matching wire colors and securing screws snugly.
-
Reconnect power and test before reinstalling covers.
Pro tip: Support the roller tube with a ladder or 2×4 during removal — it’s heavier than it looks.
To Replace Awning Fabric
-
Fully extend the awning and remove both end caps.
-
Loosen the roller tube screws on each end (don’t remove yet).
-
Slide the old fabric out from the roller and rail.
-
Clean both tracks with silicone spray or dry Teflon lubricant.
-
Feed new fabric into both tracks evenly with a helper guiding the far end.
-
Re-tension springs and secure the roller tube before retracting.
Jeremy’s Note: When we swapped fabric in Merritt, BC, we used painter’s tape to align the hem marks — saved us from re-feeding it three times.
To Swap Out an Awning Arm
-
Support the roller tube.
-
Remove the top and bottom mounting bolts.
-
Disconnect the power cable (if Smart Arm).
-
Install the new arm using existing holes and reconnect wiring.
-
Test extension and retraction several times to confirm alignment.
These simple steps have saved me and dozens of campers countless hours waiting for mobile techs. As long as you take your time, use the right tools, and work safely, Solera parts are among the most DIY-friendly on the market.
Where to Buy Authentic Solera Parts (2025 Guide)
When it comes to replacement parts, buying authentic Lippert Solera components matters. Generic knockoffs might look identical online, but tolerances, materials, and motor specs often fall short — especially under daily use or strong winds.
Here are a few trusted sources I personally use and recommend to other RVers:
1. RV Part Shop Canada
-
Excellent for Canadian RVers needing quick shipping and verified Lippert inventory.
-
Great return policy for misfit items.
-
Tip: Check their seasonal bundles for fabric + arm kits at a discount.
2. Camping World / Gander RV
-
Consistently carries official Solera assemblies and hardware kits.
-
Perfect for larger U.S. orders where you want pickup or return options.
3. Amazon (Lippert Storefront)
-
Look for “Ships from and sold by Lippert Components.”
-
Prime delivery and verified authenticity tags make it a good option for smaller parts like switches or sensors.
-
Avoid listings with vague titles or missing specs.
4. Lippert Store (Official Website)
-
Direct-from-manufacturer source for new releases and discontinued models.
-
Also provides PDF installation guides and part diagrams for every product — an underrated resource for DIYers.
-
Visit: store.lci1.com
Jeremy’s Tip:
I always keep spare bolts, switch covers, and fabric screws in a labeled plastic bin. You’d be surprised how often one missing screw can delay your weekend trip. Buy doubles of any small part — your future self will thank you.
FAQs — Solera Power Awning Parts (2025 Edition)
❓What are Solera power awning parts made of?
Most Solera components are made from powder-coated aluminum, reinforced ABS plastic, and treated steel hardware. The combination provides strength, weather resistance, and smooth motion even in humid or coastal climates.
❓Are Solera power awning parts universal?
Yes — most are. Solera’s arms, fabrics, and roller assemblies are designed for cross-brand compatibility with Dometic and Carefree setups. Only Smart Arm modules, motion sensors, and certain pitch arms require a direct model match.
❓How long do Solera awning motors last?
On average, 3–5 years depending on usage and climate. Frequent travelers in hot or salty environments may need replacements sooner, while stored RVs can go longer between changes.
❓Can I replace Solera awning fabric myself?
Absolutely. It’s a two-person job that takes about an hour. You’ll just need a ladder, socket set, silicone spray, and a steady hand. The key is to support the roller tube before removing the old fabric to prevent unrolling.
❓What’s the difference between Solera vinyl and acrylic fabric?
-
Vinyl: More affordable, waterproof, and ideal for rain-heavy regions.
-
Acrylic: Breathable, UV-resistant, and longer-lasting in sun or desert heat.
Jeremy’s Pick: Acrylic for full-timers, vinyl for weekend warriors.
❓Where can I get help identifying my Solera model?
Check under the right-hand awning arm for a small printed label with the model number. If it’s faded, take a close-up photo and contact Lippert Support — they can match it through serial coding and visual inspection.
Final Thoughts — A Note from Jeremy
After a few years of replacing Solera parts in everything from quiet lakeside campgrounds to desert dust storms, one thing’s clear — the quality of your awning setup directly affects the quality of your travels.
A cracked arm or a slow motor isn’t just an inconvenience; it can turn a relaxing evening into a scramble to save your gear. That’s why I always keep my Solera system tuned, cleaned, and ready to deploy. These awnings have protected us through everything from B.C.’s mountain winds to Costa Rica’s tropical rains — and with a bit of maintenance, they’ll do the same for you.
So, whether you’re upgrading your first power arm, swapping out worn fabric, or simply learning how the system works — take the time to do it right once. The next time you’re parked under the shade of your awning, watching the sunset roll in, you’ll be glad you did.
Ready to make your awning space even more usable? Here’s how we did it in our own rig — RV Awning Add-A-Room: Our Real-World Setup.
Safe travels,
— Jeremy Denesovych


.jpg/:/cr=t:5.56%25,l:0%25,w:100%25,h:88.89%25/rs=w:1240,h:620,cg:true)


Leave a Reply